A Guide to Container Gardening for Renters
Every winter I plan my upcoming garden. We move regularly for my husband’s naval career and our moves rarely make changes to my plans. When we moved from San Diego to Washington my plans grew, but still happened thanks to a much better growing season. When we moved from Washington to Pennsylvania they stayed the same. This was the first move where we didn’t make any plans, or pack any supplies. I didn’t think it would be possible to grow a garden in Hawaii, especially since we were renting for the first time in almost a decade. Well, I was wrong. I arrived to Hawaii at the end of June when most gardeners are weeding, harvesting and preserving there bounty. I didn’t have any plans to start a garden, but one trip to the store instantly pointed me in a new direction. July and August are the true start to Hawaii gardening and I just happen to arrive at the perfect time to start a new garden. Talk about lucky!

Gardening zones are different all over the world. I am in a 12b Hardiness zone. This zone dictates what and when to plant certain crops. We were in a 6b Hardiness zone, where we lived in Pennsylvania. This makes for very different timing and some different types of veggies that we can maintain. This is the first bit of information I would look at when starting your own garden. You can find yours on the USDA.gov website. I like their easy zip code Hardiness zone finder. You simply type in your zip code and it instantly tells you your zone! Find this tool by clicking here: USDA.gov
So we figured out that timing was perfect, especially for the Hardiness zone that we moved to, but what about the actual garden?! We are renting a townhouse, so planting in the ground is out. We have a small backyard with grass, and do not want to destroy the grass so that our dogs can enjoy the yard, which means raised beds are also out. So, what does that leave? Well, containers. I’ve never been a big container person. I always had an aloe plant and a few houseplants, but nothing crazy. I enjoy flowers on occasion, or herbs in a pot, but I’ve never attempted actual veggies for volume in containers. I figured this would take some planning, so this post will continue with how I figured out what we would plant, and when.
Step one: What to plant?
When it comes to deciding what to plant, I think about the veggies that my family enjoys eating. We are big fans of cucumbers, zucchini, beans, tomatoes and peppers. Herbs are a huge part of our cooking at home, so I like to grow herbs as well. No matter how big or small you start, I always say you should grow veggies that you will actually eat, and ones that can be made in several different ways. If you get a huge amount of zucchini to harvest, will you be able to eat it? Probably not, at least not while it’s fresh, so it’s important to think how you might preserve it as well. But, that is information for a future post and I’m getting ahead of myself. Let’s get back to figuring it out. Now that I know the types of veggies that we eat a lot of, when I can plant it? According to my hardiness zone I will know when to plant each veggie. Some plants label it on the back of seed packs, but I like to research before moving forward. I know from my research that cucumbers are ready to be planted in August for hardiness zone 12b, so I will be starting those this week. I mark my day planner (or set a reminder in my phone) for what is upcoming for garden tasks so I’m always on top of the planting and a reminder of when to start keeping an eye on harvesting. Note: If you are new to gardening, make sure to pick varieties that are container friendly. Almost anything can be grown in a container, but some things may need special care, or a different variety to thrive.
Step 2: Where to place the containers?
The location of your plants can be as simple as looking outside several times a day. We have a very small front area and a cute little backyard. The backyard is where I was hoping to place our garden, so I paid attention to which parts of the yard got sunlight and for how long. We have a great roof for shade on our patio and most of the yard gets sun all day, with half getting a full day of rays. This is important to know because most summer plants need the full day, but some plants do better with only a partial day, or little to none at all. With this information we set up a container area along the fence for a full day of sun, a small area where we can get starts growing and some shaded area off to the side for plants that may not need a full day of sun. Location and sunlight are a big factor of where to place your containers and a little research goes a long way here.
Another factor when thinking about location is how to get water to your plants. Do you have a hose that will reach the entire yard? I feel like this is the easiest route if you have more than a small handful of plants, and is what we use here. Are you able to bring a watering can out to your plants without much hassle? If you can’t use a hose, and have a lot of plants, the watering can will get old quickly and you’ll appreciate the ease of a hose.
Step 3: Choosing your Containers
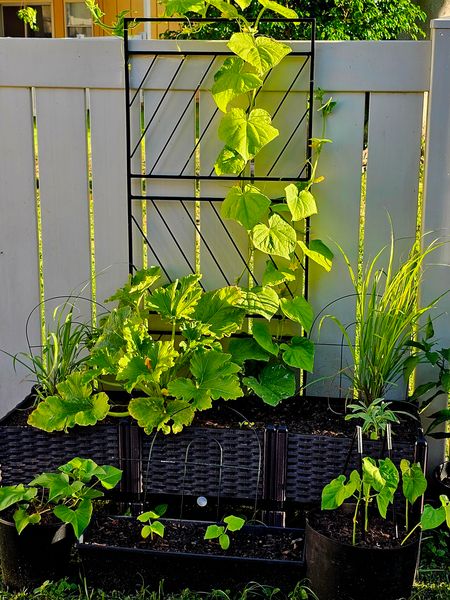
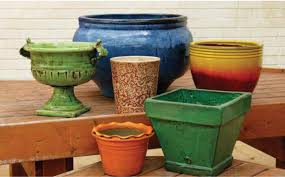
Do you want to have indoor or outdoor plants? Do you want plants that sit on the ground, or plants that hang from above? Do you want to use containers that were once something else, like buckets or coffee containers? You can do window boxes, terracotta planters and so so much more. The possibilities are endless and it is something to consider. I prefer a neat and pleasing to the eye area for gardening. When things are messy or out of order, I get a little frazzled. Yes, I know that this could be a problem, but I’m good with uniformity in my home. Even though my containers are all different types and sizes, they are all black. This gives the plant time to shine and my focus on the greenery, rather than what I think looks disorganized in my yard. Others may appreciate the mixing and matching of pots and containers. I’ve been to many gardens where it is truly stunning to have all different kinds. Find what works for you and roll with it.
No matter what type of containers you choose, there are some things that each will need. Make sure that there is appropriate drainage for your plants. Sitting water is not good for the plants and actually makes it worse for growth. Consider the size of the container for the plant you are growing. If the roots are what you are eating (carrots, radish, turnips, etc.) You will want a deeper pot to support the growth. If you don’t need a lot of root area for herbs or similar items, a shallow pot is fine. I’d also think about durability, especially for outdoor planting. Sun, water, wind and more will take a toll on your containers and something to consider for longer container life.
Step 4: Get Planting!
We started out small here at our new home. We have jalapenos and cherry tomatoes going strong from starts, and planted zucchini and cucumbers along with a bunch of herbs. These are items that are in season and ones that we eat a lot of here. I also love preserving, so I tend to produce more than we need when I’m able. The jalapeno plant is really shining and I can’t wait to can those peppers! They are a favorite for homemade nachos here at Tin Box!

As your skills improve, I would also consider companion planting, soil options and pest management. Companion planting is putting more than one type of plant into a single container. Many plants work against each other, but more often they really thrive off of each other. This is something that is learned with time, but a quick Google search will tell you if you can pair two types of veggies or an herb with a certain variety of flower. There are lots of different types of soil options at garden stores and nurseries. We have even made our own in the past. There are amendments, additives and so many things that can make the best out of your soil. Don’t get ahead of yourself, just start with basic container soil that will work with what you are planting. Typically a veggie and flower mix is perfect. As you grow as a gardener, you will see what works best for you. Pests are an ongoing problem no matter where you live. You will need to deal with everything from bugs, to birds, to rodents and small animals. If you have pets, they can work against you as well. My advice is to not go down a spiral of what-ifs, but to address each challenge as it comes and don’t let it stop you. These are the challenges that make you a stronger gardener and what will actually motivate you to keep going. You will truly get the gardening bug then! (wink, wink..see what I did there?!)
Step 5: Enjoy and Don’t be Afraid to get Creative!
Don’t forget to stop and enjoy your garden! Enjoy your morning coffee looking around at things that you, yourself, grew. Enjoy the birds chirping around your item, shoo away rabbits trying to get your strawberries and just enjoy. As you see plants growing, don’t be afraid to grow with them. Add a trellis for a on the run cucumber vine and go higher with your garden. Add flags, spinners and other garden decorations to make your space even more appealing. Don’t forget a place to sit and enjoy the bounty of your work. It truly is so gratifying to grow your own food, no matter what scale it is on.
We hope you enjoyed this outline of planting a container garden! Want some more details about gardening? Let us know your question in the comments or email me at Beth@TinBoxintheWoods.com I look forward to sharing more about our container garden journey while living here in Hawaii!